Quick Summary
If your finished piece looks a little curled, uneven, or smaller than you expected, blocking is usually the step that fixes it. By the end here, you will know how to block crochet and knitting with confidence, when wet blocking works better than steam blocking, and which fibers should never be treated the same way. If you have a shawl, square, sweater piece, or blanket that needs a cleaner shape without guesswork, this is for you.
You can have perfect stitches and still end up with a piece that looks slightly off. Maybe the edges curl, the lace refuses to open, or one sleeve panel seems to have a mind of its own. That is exactly where blocking comes in. It is the finishing step that helps crochet and knit fabric settle into its intended shape, and it is often the difference between “pretty good” and “I actually want to wear this.” The tricky part is that blocking is not one single method, and using the wrong one for your yarn can flatten texture, stretch a project too far, or do almost nothing at all.
If you have ever searched how to block crochet and knitting and felt buried under conflicting advice, the confusion usually comes from people treating every fiber the same. Wool behaves very differently from acrylic, cotton responds differently from alpaca, and lace needs a different approach than a dense dishcloth. That is why the method matters more than the buzzword. You do not need fancy equipment or a dramatic setup, but you do need to know what blocking can realistically fix, what it cannot, and how to choose between wet blocking and steam blocking without guessing.
There is also a practical side to this that gets overlooked. Blocking mats, rustproof pins, towels, and a little patience can make your finished work look more polished, but they cannot rescue a project with major tension problems or a yarn that was never meant to be forced into shape. That is why the smartest approach is to understand the fiber first, then pick the blocking method that supports it. If you have been unsure whether your project needs a soak, a mist, or just a gentle press, you are in the right place.
How to block crochet and knitting the right way
Blocking starts with one simple idea: you are teaching the fibers how to rest. For crochet and knitting, that usually means adding moisture, warmth, or both, then shaping the piece while it dries. The goal is not to make everything identical. It is to even out the fabric, open lace, smooth edges, and help measurements land where they should. For many projects, especially shawls, sweaters, and blankets, blocking is the final step that makes all the earlier work look intentional instead of slightly tense. If you are also trying to understand fiber behavior, the how to care for wool yarn guide helps explain why wool responds so well to shaping.
The first thing to decide is whether your project actually needs blocking. Dense cotton dishcloths may only need a light reshape, while lace, garments, and panels with uneven edges usually benefit much more. Blocking is especially useful when stitch patterns are supposed to open up or when pieces need to match in size before seaming. What it is not: a magic fix for a project that is wildly too small, badly tensioned, or made from a fiber that resists reshaping. Think of it as finishing, not repair. If the fabric is close to right, blocking can refine it beautifully. If it is far off, blocking can only do so much.
Before touching water or steam, check the yarn label and the fiber content. That single step saves a lot of regret. Wool and other animal fibers often respond well to wet blocking because the fibers relax and hold a new shape as they dry. Acrylic and many synthetics may respond better to a very careful steam approach, but too much heat can permanently flatten or distort them. Cotton, linen, and blends usually like wet blocking, though they may dry slower and need more precise pinning. The yarn weight also matters because heavier fabrics behave differently from airy lace; if you need a quick refresher, this yarn weights explained guide can help you judge how much structure your project should keep.
Wet blocking vs steam blocking
Wet blocking means fully soaking or thoroughly wetting the project, gently removing excess water, shaping it, and letting it dry flat. This is the method most people picture when they think of blocking, and it is usually the safest choice for natural fibers like wool, alpaca, cotton, and linen. It gives the fibers time to relax evenly, which is especially helpful for lace, granny squares, and garments that need accurate measurements. If your project has a lot of stitch definition or needs the fabric to open up, wet blocking is usually the most predictable path.
Steam blocking uses heat and moisture from steam rather than full immersion. It can be useful for acrylic blends or projects that only need a light adjustment, but it demands caution. Too much heat can melt synthetic fibers, flatten texture, or create a permanent shine. Steam blocking is less about soaking the fabric and more about coaxing it into place. That makes it useful for minor shaping, but not always the best choice when you want a dramatic change in size or drape. If you are unsure, test a hidden corner first. A small test can save an entire finished piece.
The fiber type should decide the method, not habit. Wool usually thrives with wet blocking because it has memory and elasticity. Cotton can benefit from wet blocking too, though it may not spring back as much, so you want to shape it carefully and let it dry fully. Acrylic is the one that causes the most confusion: some acrylic projects can be gently steamed into shape, but many should not be exposed to direct heat at all. That is why the label matters, and why blocking is less about rules and more about reading the material in front of you.
What you need before you start
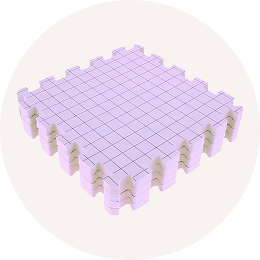
You do not need a studio setup to block well. A clean towel, a flat surface, and a way to hold the edges in place will cover many projects. Blocking mats are helpful because they give you a grid, which makes it easier to square up a blanket, line up lace points, or match sweater pieces. Rustproof pins are the other useful tool, especially for shaping edges without leaving marks. If you are working with a larger item, interlocking blocking mats are worth the space because they let you expand your layout instead of fighting for room on a table.
The real key is to work with the project, not against it. Lay the piece flat, support its weight if it is heavy, and avoid yanking fabric into a shape it clearly does not want. For crochet, especially openwork pieces, pinning the corners and a few key points is often enough. For knitting, you may need a little more precision around curves, hems, and edges that roll. If the piece is delicate, a towel underneath can help absorb moisture and protect the surface while it dries. The setup does not have to be fancy; it just has to be stable and patient.
One thing that surprises people is how much blocking depends on drying time. Moving a piece too early can undo the shape you just set. That is why it helps to block when you know the project can sit undisturbed for several hours or overnight. If you are in a humid room, drying may take longer. If the fabric still feels cool or damp, leave it alone. The shape sets as the moisture leaves the fibers, so rushing this step often gives you a wobbly result that looks fine for an hour and drifts again later.
Common mistakes and fixes
The most common mistake is using too much heat. That is especially risky with acrylic and other synthetics, which can lose texture or become permanently flattened. The fix is simple: if the fiber is synthetic or blended and you are unsure, start with a gentler method and test first. Another frequent problem is over-stretching. It is easy to get enthusiastic when the fabric suddenly opens up, but if you pull too hard, the finished piece can end up larger than intended or warped at the edges. Shape to the pattern measurements, not to the maximum possible size.
Another issue is blocking too soon or too late in the project timeline. If you block before weaving in ends or before finishing seams, you may distort the shape again later. If you wait until after assembly on a garment, you might have a harder time correcting individual pieces. The fix is to block at the stage that matches the project: individual pieces before seaming when needed, or the finished item if the construction allows it. For lace, blocking usually happens after the piece is complete, because the open structure is the whole point.
People also underestimate the importance of even pinning. If one side has more tension than the other, the piece can dry crooked. Use the grid on blocking mats or measure from the center outward to keep things balanced. If a section keeps curling, do not force it with extra pins alone; check whether the fiber actually needs wet blocking instead of steam, or whether the original stitch tension was the real problem. Blocking can improve shape, but it cannot fully rewrite the fabric.
Pro tip
If you are blocking a project with repeating motifs, pin one square, motif, or lace repeat perfectly, then use it as your visual reference for the rest. That keeps the whole piece consistent without turning every section into a separate guessing game. It is a small habit, but it makes a noticeable difference when you are trying to square up a blanket or keep a shawl edge from wandering.
Ready to make your next project this good?
Mrs. Quilty delivers a complete quilting project to your door every month — pre-coordinated fabric, tools, pattern, and video guidance included. Over 65,000 quilters have started their journey here. Box 1 is designed for exactly where you are right now.
Use LEARN20 for 20% off your first box

How to choose the method by fiber
If your project is wool, alpaca, mohair, or another animal fiber, wet blocking is usually the safest and most effective choice. These fibers relax well with moisture and tend to hold the new shape once dry. That makes wet blocking ideal for sweaters, shawls, and anything where drape matters. Cotton and linen also usually do well with wet blocking, though they may dry stiffer and need careful shaping to avoid distortion. The key is to respect the fabric’s natural behavior rather than trying to force a result you saw on a different yarn.
For acrylic, the answer is more cautious. Some acrylic pieces can be gently steam blocked, but many should only be lightly shaped or left alone if the fabric already looks good. If you are working with a blend, check which fiber dominates. A mostly wool blend can often behave like wool, while a mostly synthetic blend may need a much gentler touch. When in doubt, test a small hidden section. That is not being overly careful; that is being smart with hours of work and a skein you probably do not want to replace.
The project itself matters too. Lace often benefits from wet blocking because the pattern needs room to open. Scarves and shawls usually need more shaping than dishcloths. Garments may need blocking before assembly or after, depending on the construction. Even if you only remember one thing, make it this: the best blocking method is the one that matches the fiber, the stitch pattern, and the amount of change the fabric actually needs. That is how you get a cleaner finish without turning a good project into a stretched-out one.
Closing Thoughts
Blocking is not an extra chore for perfectionists. It is the finishing step that helps your crochet and knitting look the way you hoped they would when you first cast on or made that starting chain. Once you understand the difference between wet blocking and steam blocking, the process gets much less mysterious. Natural fibers often like a full wet block, synthetics need more caution, and blocking mats make the shaping part much easier to control. The more you pay attention to fiber content and project type, the more predictable your results become.
If you have been nervous about ruining a finished piece, start small and keep the method gentle. A swatch, a dishcloth, or a simple square is a good place to practice before you block a favorite shawl or sweater panel. You do not need to master every possibility at once. You just need a method that fits the yarn in front of you and a little confidence that the fabric can settle into place. That is the kind of practical yarn-craft support Hooks & Needles is here for: clear instructions, thoughtful pattern guidance, and projects that help you finish with less stress.
When you are ready for your next project, it helps to have ideas and materials that are already working together. That is where a little structure can make the whole process feel easier, from yarn choice to final blocking.
FAQ
Do I have to block every crochet or knit project?
No. Small sturdy items like some dishcloths or simple accessories may only need a light reshape. Lace, garments, and pieces that need exact sizing usually benefit the most.
Is wet blocking better than steam blocking?
For wool, cotton, linen, and most natural fibers, wet blocking is usually the better choice. Steam blocking can work for some synthetics and light shaping, but it is riskier.
Can I use blocking mats for crochet and knitting?
Yes. Blocking mats are especially useful when you want straight edges, even measurements, or a grid to help square up panels and lace.
What happens if I block acrylic with too much heat?
The fabric can flatten, lose stitch texture, or even become permanently distorted. If the yarn is synthetic, test carefully and use the gentlest method possible.
How long should a project dry after blocking?
Drying time depends on fiber, thickness, and humidity. Light pieces may dry in a few hours, while heavier items can take overnight or longer. Wait until the fabric is fully dry before moving it.